Easy 'N' Inexpensive
Ways To Enhance Classic Metal Works Cars & Pickups
Steps for enhancing Classic Metal Works 1978 Impala
My examples of the 1978 Impala had crooked rear bumpers. If the bumpers are straight and flush fitting on your examples skip steps 1 through 4.
- Use the no. 62 drill in the pin vise to drill out the center of the metal posts that attach the car body to the chassis.
- Remove the chassis and tap the holes drilled in the posts to accept the 00-90 screws
- File any material from the rear bumper assembly that prevents the bumper from fitting flush with the car body
- Reattach the car body to the chassis with the 00-90 screws
Decal license plates (optional)
Dust with powdered Tempera paints using a dry paint brush (can also tone down the overall shine of the finish)
Black for brake pad (or shoe) dust and tire weathering
Brown for dirt and dust

Steps for enhancing Classic Metal Works Ford F-1 pickup
One of my examples of the Ford F-1 pickup had a crooked front bumper. If the bumper is straight and flush fitting on your examples then steps 1 through 5 are only for those wishing to replace the stock wheels with larger wheels, such as Tomix wheels axles.
- Use the no. 62 drill in the pin vise to drill out the center of the metal posts that attach the pickup body to the chassis.
- Remove the chassis and tap the holes drilled in the posts to accept the 00-90 screws
- File any material from the front bumper assembly that prevents the bumper from fitting flush with the pickup body
- Paint the flat “ridge” on the Tomix wheels white if you want white wall tires
- Reattach the pickup body to the chassis with the 00-90 screws
Decal license plates (optional)
I liked the results of replacing the rather undersized stock CMW wheels with the Tomix wheels so much, I used the same procedure on the Classic Metal Works Ford convertible, which came with straight and flush fitting bumpers.

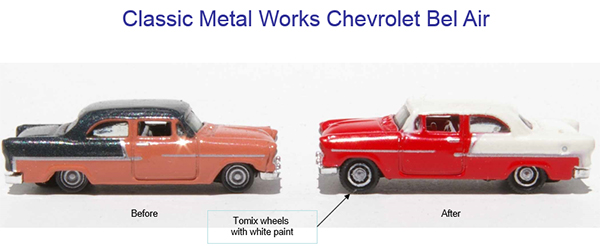
Steps for enhancing Classic Metal Works 1955 Chevrolet
The rear wheels on my examples of the 1955 Chevrolet Bel Air were set too far forward in the wheel well. I wanted to make the rear wheels more visible by moving them back a bit, follow steps 1 through 6 to move the rear axle back, replace the stock wheels and axles with Tomix Elf pickup wheels and axles, and insure the bumpers are straight.
- Use the no. 62 drill in the pin vise to drill out the center of the metal posts that attach the car body to the chassis
- Remove the chassis and tap the holes drilled in the posts to accept the 00-90 screws
- File or grind about 0.04 inches of material from the chassis at the back of the slot for the rear axle. Glue a piece of 0.04 X 0.04 styrene to the front of the enlarged slot to force the rear axle into the area at the rear of the slot.
- Paint the flat “ridge” on the Tomix wheels white if you want white wall tires
- Check the bumpers for a flush fit, remove any excess material by sanding or filing
- Reattach the car body to the chassis with the 00-90 screws
- Decal license plates (optional)
Challenges
Drilling the metal posts requires a great deal of patience.
Finding a source of replacement wheels and axles. The Tomix wheels and axles came from automobile sets I had purchased, but decided not to use on my layout because they were oversized or too unusual.
We really need a source of good replacement wheels for automobiles!
Contact: [email protected]